Wednesday, June 25, 2014

A Monochromatic Card for the Butterfly Challenge

I don't do monochromatic very often, but when I saw it was this months theme for the Butterfly Challenge I immediately thought of a tutorial I had read in a recent Craft Stamper magazine. I stopped having a craft magazine subscription when I moved to Spain as the increase in cost was far more than the extra postage, and you are not eligible for the subscription gifts nor any of the promotional giveaways. So when I am visiting UK, I usually treat myself to one or two magazines, and CS was always my preferred choice.
I didn't follow Kay Carley's tutorial exactly, but her ideas pointed me in the right direction.
So for my card I spread some Imagination craft Sparkle Medium over a Crafter's Workshop stencil, and when it was dry I sponged distress ink over the background, and highlighted the stencil image with copic markers. I used the same two distress inks - Milled lavender and Dusty concord,  to over stamp with some Chocolate Baroque wild flower stamps, and mounted the whole thing onto a deep lilac card.
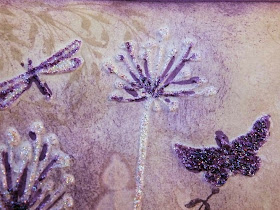
I do love that Sparkle Medium. It is much more sparkly than any other paste I have used, and because the alcohol ink is transparent, colouring over the paste didn't diminish the glitter effect.


As you will see, I decided not to add a sentiment at this stage, as I didn't make the card for a specific person, and it could be used for many occasions. So I will add the sentiment when I know what it is to be used for.
Now I will link this up over at Mrs A's Butterfly Challenge #9; Monochromatic. If like me, you also find butterflies enchanting, and just the thing for crafting with, why not fly over with me and get involved.

A Set of Four for Rudolph Day

My word; How the months fly by, and here we are at Rudolph Day again. (For those who don't know what that is, pop over to Stamping for Pleasure, and get inspired to make some Christmas cards on the 25th of each month).

I decided to set my Silhouette to work again for this month, but this time I was cutting card. I have had mixed success at this, but I put a new blade in my machine, and it cut like a dream.
First I used the Silhouette Studio software to make a cutting file for the words Peace & Joy, choosing a font with nice bold lines for ease of cutting. Then I rifled through my Christmas snippets box and
found four pieces of sturdy paper that I thought came from the same pad - Dovecraft I think - which meant they would all cut at the same settings. The cutting mat for the machine has a grid marked on it, (a little annoying because it is marked in inches and I always work metric these days), but I used this to place my offcuts in the right positions to match the words that I had repeated four times on the screen.

Next I set it to cut. I removed the unwanted surrounding paper, carefully so I could use it later, and was left with four sets of words. I mixed the letters up and glued them onto four DL cards. 

Then I wanted a frame to go around them so I adapted a square frame that was already on my library of files, and made it fit  with just enough space to include the words 'Wishing You'. This time I did cut them from vinyl, two from some gold sparkle vinyl, and two from black sparkle. I cut just one to see how it looked and when it came to weeding out the unwanted bits, I found there were over 200 tiny pieces to be removed individually using my faithful pricking tool! The little white square is where I did a test cut to make sure I had the right settings. I made sure I salvaged the centre of each frame with its backing paper intact, so they are in my vinyl snippets box for another time. I used transfer tape to place the frame around my words, and I was quite pleased with it so I went ahead and cut the other three. The black sparkle turned out to be a nightmare, as it was impossible to see the cut lines, so weeding it was guess work at first. But I got them all done. I then used the surrounding papers from the original words to die cut some flowers. They are not quite poinsettias, but near enough. I layered them together with a brad, and glued one to the lower left corner of each card.
My first two cards were made with traditional red and dark green base cards.
Then I made two non-traditional ones with pink and black background.
So that's four more cards to add to my store, and now I shall link them up with the Rudolph Day Challenge over at Sarn's blog, and also with Pixie's Snippets Playground.

Tuesday, June 24, 2014

With Sympathy

I guess we all need to make 'With Sympathy' cards at some time, and this week it was my turn, when my husband's younger sister, finally lost her long battle with cancer. I said I would send a card to her husband and Chris wanted me to stick to the traditional black and white format, so I did. 

I used the Wild Flowers die from Memory Box, and some off-cuts of black card to cut the inside and outside edges of a deckle rectangle die to make a frame. The sentiment is from a very old Elusive Images sheet of stamps, and I used deckle edge sissors to cut  around the backing paper.
Sorry it is a poor photo. I always have trouble with the white ones! 


I then decided to make three more cards for their children, all grown up with babies of their own. They are each a bit older than our three younger boys and they all grew up together.


For the boy I made one the same as his Dad's. I needed to have them in the post first thing on Monday morning so there was no time to design lots of different ones. 


I then used the same die-cut flower for the girls but with a more fancy oval frame, and instead of the deckle edge, I used a different embossing folder for each background.


For the base cards I used the very last of a huge set of black and navy A6 and DL cards, that were my first ever buy from QVC, probably around twenty years ago. There was a vast number of them, and although the navy ones got used up, the black were less useful, but I am glad that I have used them in the end. This last four were all DL size, but I cut two of them down a little because I liked the proportions better.


Saturday, June 14, 2014

Briar Rose.


One of my sisters will be eighty-six at the end of the month, so last night I made this card for her, using a new set of stamps I have just bought from Chocolate Baroque. Their June release is two A5 sheets of stamps, one featuring the Briar rose, and one the Harebell, and both have several butterflies as well. For this card I chose the main rose stamp.


I stamped it onto white card, then masked it off and used ink dusters to add a little blue and green to the background. I then coloured the image gently with copic markers. I stamped it again a couple of times, and used the second print to add an extra layer to the lower butterfly, and the front wing of the top one. The third print I coloured in the same way and covered it with adhesive glitter acetate, to use as a final embellishment.
The frame is cut using a snippet of pink card and a Spellbinders, Decorative labels 8 die with the centre removed, and I cut around the outside of the die so the main image made its own mat.
For the base I made a white card and delving into my pink patterned snippets, I came up with some pale pink gingham paper from a very old pack I bought from the QVC seconds shop, years ago, which I used to cover the front of the card. Before sticking it down I passed it through a floral,  'Peter Rabbit' embossing folder from Crafter's Companions, which just adds a bit of interest, and I took the green from the image out to the egdes with  two strips of washi-tape across the background. I finished  it off with my 'extra' butterfly and a tiny stamped sentiment from again, an old but loved, Elusive Images stamp.
So for once I have a card ready to post without the usual last minute panic!
As I have used some snippets I am linking this to Pixie's Snippets Playground, week 128
Also, Pink , Butterflies, and Dry Embossing is a Bingo line in Mrs A's Butterfly Challenge this month, so I shall pop over and link up there too.

Thursday, June 5, 2014

Another project finished at last

A few months ago I started on a project to make Word Art frames for each of my boys. The idea was to make one for ourselves as a trial run, so I started with an old frame which I painted with white gesso and then several layers of Paper Artsy Fresco Finish paint, including a layer of their crackle paint. Family situations then meant that I was visiting UK earlier, and for longer than originally intended, so I needed to go ahead and make the boys frames, without a trial run, and ours was 'left hanging', well, the empty frame was anyway.

So this week I decided to have another go at it. I used photoshop to make the background, with a layer of mottled green digi scrapbook paper, and photos of Chris and I, and one of the whole family group. Because the frame was long and narrow, there was not room for the large individual photos I used for the boys, so I selected just a cameo of each, lightened them so they did not stand out too much, and clipped each one to a circular photo mask so that they had no sharp edges, but rather, they blended into the background.


Then I made the script in my silhouette software. I was using elements from other boards I have seen on the web, mix and matching them to suit me, and adding my own header. I sized it to fit on the 'empty' part of the background and cut it from black vinyl. Then comes the dreaded weeding. I had watched a video on how to add weeding lines, which are a set of horizontal lines that are cut along with the script, so that you can remove the waste background in strips, instead of one large piece. It made a huge difference, and the main weeding was soon done. All that was left to do, was to remove small elements such as the inner circles of closed letters.
Once that was done, all that was left was to use transfer tape to lift each couple of lines, and transfer them onto the background. I do have a roll of wide transfer paper that would have enabled me to do it in one go, but I was worried about placing it straight, and the transfer paper actually lifting the printed surface if I needed to reposition it, so the narrow tape was easier. I just had to be make sure that I didn't lose any tiny elements like the speech marks, and the dots over the 'i', and be careful to align them correctly, which I did by putting the background over the vinyl and holding them against the window as a light box, so I could put feint alignment marks on the paper!

Then I cleaned up the glass, and assembled it in its frame. Now it just needs a hook to hang it up, and as my other half actually said it looks quite smart, I may get it done for me later. 


Monday, June 2, 2014

One image; Two takes


Last week I made two cards for men, so this week  it is the turn of the ladies. I had someone in mind when I made the  first one. Once again I was browsing the All Things Silhouette Facebook page which is a great source of inspiration for me. and I came across an image called 'Rainbow hair' that I knew I had to try.

 A lady called 'La Isla Eva' had kindly posted the cutting file for it, so I opened it up and had a play around with it. I down sized it a bit, and having separated all the elements, I then grouped them to use with different colours. I raided my newest snippets box - off-cuts of vinyl -  and found pieces that all went together quite well, including a small piece of black for the head. I then moved each group of elements to a different area of the cutting mat on the screen, and used the grid lines on the actual sticky mat to place my pieces of coloured vinyl. Then I cut it all out. I used transfer tape to lift each section and place it onto a white A5 landscape card. This left too much white space for me so I used some black sparkle vinyl to cut two lengths of trellis using a Memory Box die, and stuck one down each side of the card. I made two butterflies by covering a small piece of white card with some really tiny left over pieces of coloured vinyl and die cutting two solid butterflies. I then used some more of the black sparkle vinyl to cut two of the matching fancy butterflies and stuck these over the coloured ones. I added one to each trellis and then cut three sizes of little flowers again from left over pieces of vinyl, using an old border punch. and dotted these randomly on the trellis. Finally one more piece of black sparkle was used to die cut the Happy Birthday using a Britannia die, and as I had three left over flowers, I added these to the sentiment. The birthday girl is celebrating today, so I can now show her card which she loves.
I wanted to do something else with this lovely image so I made it a little smaller and cut it again from a sheet of Silhouette double sided adhesive. This proved to be a disaster as the bottom layer of protective paper stuck to my new, very sticky, cutting mat, and the top layer of protective paper was too easy to remove and wouldn't lift with the sticky film attached. So the first attempt was a write off! But I didn't want to give up too soon, so I cut it a second time, and then I cut it from my pearl paper to make a mask. With this glued in place on a piece of white card, I was able to lift the elements one at a time and place them through the mask. It had been my intention to use gilding flakes, but when I was looking through a drawer to find them, I came across a roll of tonertex film, bought at a craft show at least ten years ago and never used! I don't even know if you can still buy it. Anyway, there was sheet in the roll that was a random pattern of colours and I decided to use that instead of the gilding flakes. Because the little sticky elements were catching on the mask I needed to lift the mask regularly and colour a section of it so it was no longer sticky. I didn't do a very accurate job of placing  it back each time, so my completed image had rather a large gap below the lower hair area and the neck, so I cut a few extra pieces to fill this. I again cut the head from black vinyl.

This time I used the base card in the portrait orientation, and I used a SU Everything Eleanor stamp and versafine ink to add a swirl in the lower right corner of the card and along the top, and embossed these with my favourite disco black embossing powder which had bright glitter in it. Then I matted the main image on to silver holographic card coloured with black alcohol ink, and mounted it over the swirls. I used an off-cut of the adhesive film on white card and what was left of the tonertex sheet to cut a butterfly as above, and added a black fancy one over it. After rummaging around I found some shiny 'plastic' flowers and added these to the swirls. A sparkly black die-cut Happy Birthday completed this one. I am sorry the photo is not very good. I took this one in artificial light.

As I used so many offcuts of vinyl I am linking these to Pixies Snippets Playground, and the second card also meets the criteria for Mrs A'S Butterfly Challenge 8. This month we are playing Bingo and I have used the row, Wet embossing, butterfly and flowers.