Handicrafts by Kate Perry and other ramblings

Sunday, July 27, 2014

My First Commission

My crafting is my hobby, and apart from making a few items for the Christmas charity stall etc, I have no desire to sell my 'makes', or fulfil orders for anyone. However, my youngest son's partner has just celebrated a significant birthday, and when Ben asked me if I could make 'one of your vinyl thingys' for him to give to Dave, of course I said I would. And I really enjoyed doing it too. I was given a list of his favourites - colour, quote, song, poem, book etc, and I chose to  work with the colour and the poem because I liked it so much.
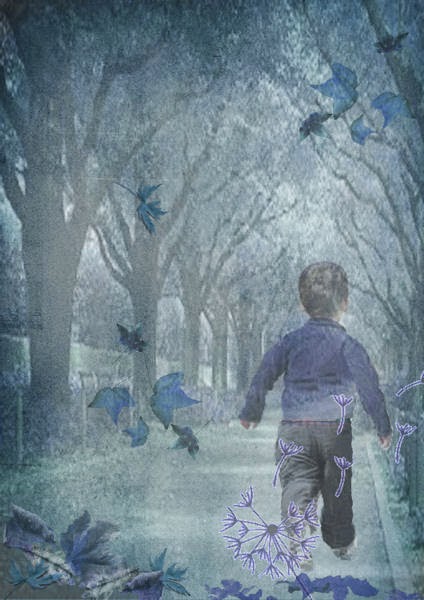
I read it through a couple of times and picked out the images that came to me; a winding path with a small boy walking on it, trees with swirling falling leaves, and a dandelion head with the seeds blowing away.

I chose a blue background from a digi-scrapbook kit, and searched in google images for other ideas. Eventually I settled on these two.

I made the background layer the right proportions to match the plain black frame I had bought, and in adobe photoshop I changed the hue of the road to blend with the background, faded it out and stretched it to fit. Then I digitally cut the little boy and added him as a layer onto the road, again changing the hue to blue, and making him a suitable size. His trousers stood out as still having a brown tint so I then cut them out separately and turned them a true blue and added them over the brown ones. For the leaves and seed head I used elements from several digi scrapbook kits, trying to get them all to similar tones of blue. I faded each of them so no one stood out from the others, and then I flattened it all into a jpeg image, and used Publisher to size it to fit the frame exactly, and printed it out.

I printed out the poem in several different fonts and sent them to Ben to chose, and once he had decided, I printed it in my Silhouette cameo software, fiddling around with size and spacing until it was just right, and then I cut it from Black vinyl. I knew if I used a sheet of transfer paper to lift it in one go, I would risk sticking to and tearing the printed background, so I did a few lines at a time. The spacing isn't perfect, but Ben didn't want me to do it again, and said he couldn't see what I was worrying about! Considering how small the print was, it cut really well, though of course it was fun weeding out all the tiny centres of the 'closed' letters. I only had to re-cut a couple of letters, and eight dots for the 'i's'!
So here is the finished project.
I have tried to add this as a large photo so you can read the words which I find quite moving, especially the last few lines. He wrote it when his young son first went away to boarding school. (The eagle-eyed among you will have noticed that a letter is missing in the last verse. Fortunately I spotted this and was able to put it right).
Also fortunately, my husband made an unexpected visit to UK last month, and was able to take this with him and hand-deliver it. I promised I would not put it on my blog until it had been given. The birthday has now passed and I am told he was thrilled with it, and of course, it is quite unique, which it makes it a special gift.  
So that is my first commission done and dusted. I'm not looking to do any more but I'm always happy to do something for one of my boys!

Friday, July 25, 2014

Finding my mojo for Rudolph Day

Well it seems like ages since I was posting on here, though I've really only been AWOL for two weeks. (There has been one post in that time because I was guest designer for the Butterfly challenge, but that was done well in advance and scheduled to post on the right day!). I haven't actually been away at all, but I have enjoyed two weeks with my lovely grandsons and their girl-friends. We don't see them very often, so with such a lot to catch up on, I left the computer sleeping.
But when I have had a break from crafting, I find it really hard to get started again, so Sarn's timely reminder that Rudolph Day is here again, was just the incentive I needed to make me get busy. If you don't know what I am talking about, pop over to Stamping for Pleasure, and maybe join in by posting two Christmas cards on the 25th of each month. It's a great way to get started on your Christmas stash.
For my first card I decided to CASE one made by Sue Wilson. I am sure many of you watch her on create & craft TV. I don't have that opportunity but I do follow her blog and pick up some useful ideas from her videos on Joanna Sheen's shop website. Her card was in pretty shades of lilac and green, but I thought it would also make a good Christmas card. You can see Sue's card, and follow her tutorial for making it, by clicking here


Instead of her pastel shades, I used glitter with strong Christmas colours, and cut the frame from ivory pearlescent paper. The base card is matching ivory pearl card. Both the inner fancy circle and the outer frame are cut with Sue Wilson's new die set - Italian Collection, Calabriar. To make the outer frame stand out from the background, I cut a mat from an ancient piece of old-gold paper. I have no idea where it came from. Before assembling everything, I cut the sentiment with Britannia dies from the centre of the gold mat. To finish it off, I used snippets of red and green paper to cut the ivy flourish and poinsettias, both using Joanna Sheen's signature dies. Since taking this photo, I have also added a dark red nailhead to the centre of the circle and it looks just right.
I really like the look of the glitter, especially on a Christmas card, (If you haven't seen the tutorial, it is glued to the back of acetate, behind the frame), and I will probably make some more of these at a later date, but it was fairly time-consuming as each colour of glitter needed to be almost dry before the next one was added. On her video, Sue does them one after the other, but even using an anti-static bag, I found quite a lot of stray glitter clinging to the wrong areas, so I needed the glue to be fairly dry before trying to clean this off and add the next colour. Still worth it I think.

This was all done last night, so I then had to think of a second card that would be relatively quick to make. I had also bought some other Sue Wilson dies, from the California Collection, the Basic frames, and Decorative frames set B, and I wanted to try them out. These are a nice shape to work with, and the two sets do work together in most sizes, though there is no mat for the largest decorative frame. Anyway I chose a smaller plain and fancy pair, and then rooted through my box of Christmas scraps to find an image that would fit them. This one of the three kings was just perfect. So I cut it with the plain die, and then found some snippets of gold mirri-card to cut the fancy frame. Next I stamped the verse which is one of my oldest Clarity stamps, with versafine ink, and embossed it with Cosmic Shimmer gold detail powder. I also layered this onto a narrow gold mat. For the paper I used a sheet from a Papermania set called Silent Night. I sent for it in with some other items a few years back, but was disappointed when it came because it is so dull, and I haven't used much of it. However, I did find this sheet in dark red with a small gold dot pattern which worked fine. The base card is again made from the ivory pearlescent card. I accidently bought two big packs of this on two trips to a craft shop in Albox, which is just too far away to justify going back to exchange one. It is a useful, neutral colour which is just as well, as I am likely to be using it for a few years yet! To add a little interest, I cut two lace edging strips from those strips that always seem to get left over, and you can never decide whether or not to save them. Now I have edge dies, I always save them! I think this die is a Spellbinders one but I am not sure.
So that is two more cards for the pile. Now all I need to do is to link them up with Sarn's Rudolph Day Challenge, and Pixie's Snippets playground.

Wednesday, July 16, 2014

Spots and Stripes for the Butterfly Challenge.


I was a lucky winner on the Butterfly Challenge #8, and as a result I was invited to be a Guest Designer for the new challenge this week. This was exciting as it is not something I have done before. I was a bit less sure when I heard the theme was Spots and Stripes, and of course, Butterflies, as I rarely use regular geometric designs in my craft, but I managed to make this card.

I remembered that I have a few cut and emboss butterfly dies with spots and stripes on. So I dug these out and started to play around with them. They were all quite small so I also got out some larger butterfly dies to be the focal point on my card, a large, ornate one from Wild Rose Studio, and a smaller one from Memory Box.
I stamped a piece of white card with a Swiss dot stamp by inkylicious, and embossed it with blue interference powder, and used this as a background for the two larger dies. I made a square base card from a sheet of royal blue, and used the left-overs to cut the two butterflies which I matted onto their spotted backgrounds. 
Next I used white card to cut and emboss the spot and stripe butterflies with JoyCraft dies, and added colour to them with Memento Paris Dusk ink before removing them from the dies. Then with some tiny snippets of paper I cut and embossed the smallest butterflies from a set by Stampin'Up, and gently swiped them with the same ink pad to bring out the embossing.
The background papers are snippets from an SU pad I think. They were in my bit-box, but they toned perfectly so I think they were from the same set. 
I mounted the two large butterflies on the central strip, and my Libran need for balance means the others were placed fairly symmetrically on each side. A greeting cut with a Britannia die from the last of the blue card, completed my design.
As well as the Butterfly Challenge #11, I am posting this in Pixie's snippets playground.

Tuesday, July 8, 2014

Cheers!

I have been rather noticeable by my absence just lately, but this does not mean I haven't been spending time in my craft-room. It is just that I have made several projects that are all 'time-sensitive', so after their relevant events have taken place, I will be blogging very frequently for a while.
However I am going to show one card that I have made. My son's partner has a 'significant birthday' coming up, but I know he will not be seeing this blog so I think it is safe to show it now.
I started with some cream card that I cut on my silhouette cameo to form a 15cm square card back with a wine bottle attached at the left edge.

I used some digital scrapbook paper from a kit called 'Wine o-clock', and in photoshop I added a glass of wine and a cork from the elements file.

There were no grapes in this file, which I felt there should have been, so I found some google images of a fruiting vine, and a bunch of grapes, and conveted them to png files so I could slide them onto my background. I printed this out and glued it to the inside of my card blank. 
From a left over piece of card I cut a second bottle and swiped it with distress inks, and when it was completly dry, I used versamark ink and fine, clear embossing powder to make it look like glass. I used an even smaller card snippet to cut a cork and wound twine around it and then covered it with adhesive foil ribbon, and coloured it with green alcohol ink.
I am not sure where the original label came from but it has been in my files for quite a while. (I believe it is modelled on a Jack Daniels label!). Anyway, I opened it in publisher to add my own words and the relevant year, and printed it onto a snippet of parchment paper and distressed it with Old Paper distress ink. I curled one corner and then glued it to my wine bottle. A matching snippet made the tag - printed on the computer -  which I matted onto dark red card and then some of the 'cut-away' from the base card.
I thought there was rather too much brown space in the centre, so I distressed another piece of my cut-away card and used a Britannia alphabet die to cut the word Cheers.
This picture shows the separation of the wine bottle better. Fortunately there was nothing on the back of the bottle inside the card, so I was able to write my message to him on there.               I used a lot of off-cuts of paper and card for this, so I shall pop over to Pixie's Snippets Playground to join in the fun there.